 |


|
Stella
DellaVella Originals
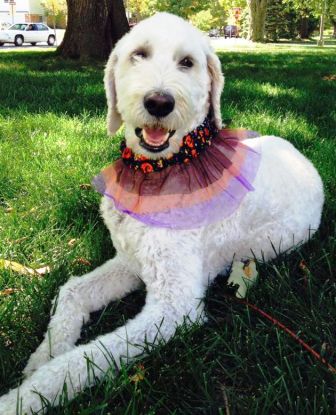
This is Lucy Doodle and she's Daisy's new BFF, besides Sammy and Lilly. Daisy is a bit mischievous and Lucy Doodle keeps Daisy under her paw. Lucy Doodle LUVS LUVS her Ghostacular Halloween Collar. She just WOULD NOT take it off after she posed for her Howloween picture. She is going Trick or Treating with it on this year. OMG!!! So I thought this year I would make Pumpkin Howlers Doggy Biscuits for all the dogs that come to my house Trick or Treating and put them in cute little pumpkin decorated bags. Okay, back to the Ghostacular Dog Collar!!!
Here's what YOU will need:
Here's How YOU Can Do it: 1. Lay the piece of Halloween material (that is the collar) on a table so the right side is facing up. 2. Layer the netting over the piece of Halloween material. Layer the 4-inch wide piece, then place the 6-inch wide piece over that, and then the top layer should be the 8-inches wide piece of netting. Put the raw edges of the netting over the edge of the material. Here's a picture of the netting layered over the Halloween material dog collar.
NOTE: You can make the pieces of netting any width you want. Lucy is a big dog, so she needs longer netting than Lilly would need. We might cut Lilly's netting in half. So she would have a 2-inch, 3-inch and 4-inch piece of netting. Sew all the layers together 1/2-inch from the edge. 3. Turn the unsewn edge of the Halloween material under about 1/2-inch and iron. Then pin that over the seam and pin along the edge and sew close to the edge. It's helpful if you press the seam with all the material towards the inside of the Halloween collar material like in the picture below.
In the picture below you can see the sewn lower edge.
4. Now we want to place the elastic inside the seam that we just sewed together.
Put a safety pin on the end of the elastic and push it through the seam. Remember that the piece of elastic is half the length of the material, so as you pull it through, the Halloween material will gather.
When the elastic reaches the end, sew it by machine so it doesn't pull back through the collar.
5. Put the two ends of the collar, right sides together and sew a 1/2-inch seam.
Here's another picture of a side seam that I sewed on another collar.
And this is what the final collar looks like.
It's GHOSTACULAR!!
And REMEMBER - it doesn't have to be PERFECT! BTW - I have the cutest ever pictures of Daisy in my first Diary. She's in her Blingy Collar that has daisies on it!!! OMG!!!!
Copyright ©
2014-2017 Susan Patton |
|
|

